In today’s fast-paced digital world, seamless connectivity and efficient multitasking are essential, especially for professionals and students working across multiple devices. The Wavlink Docking Station emerges as a game-changer in this domain, offering a reliable and versatile solution to enhance productivity and streamline workflows.
A docking station acts as a central hub that connects a variety of devices to your laptop or desktop. The Wavlink Docking Station, in particular, stands out for its user-friendly design, robust performance, and compatibility with a wide range of gadgets. It eliminates the constant plugging and unplugging of peripherals, allowing you to transform your computer into a fully-equipped workstation with just one connection.
Whether you’re managing multiple monitors for a project, connecting external storage devices, or integrating various peripherals like keyboards and printers, the Wavlink Docking Station simplifies the process. Its ability to support high-speed data transfer, power delivery, and seamless display integration makes it an indispensable tool for anyone seeking efficiency in their daily tasks.
By consolidating multiple functionalities into a single device, the Wavlink Docking Station reduces clutter, saves time, and enhances your overall workflow. It’s not just a convenience—it’s a necessity for anyone looking to maximize the potential of their devices in a connected and streamlined way.
Understanding the Wavlink Docking Station
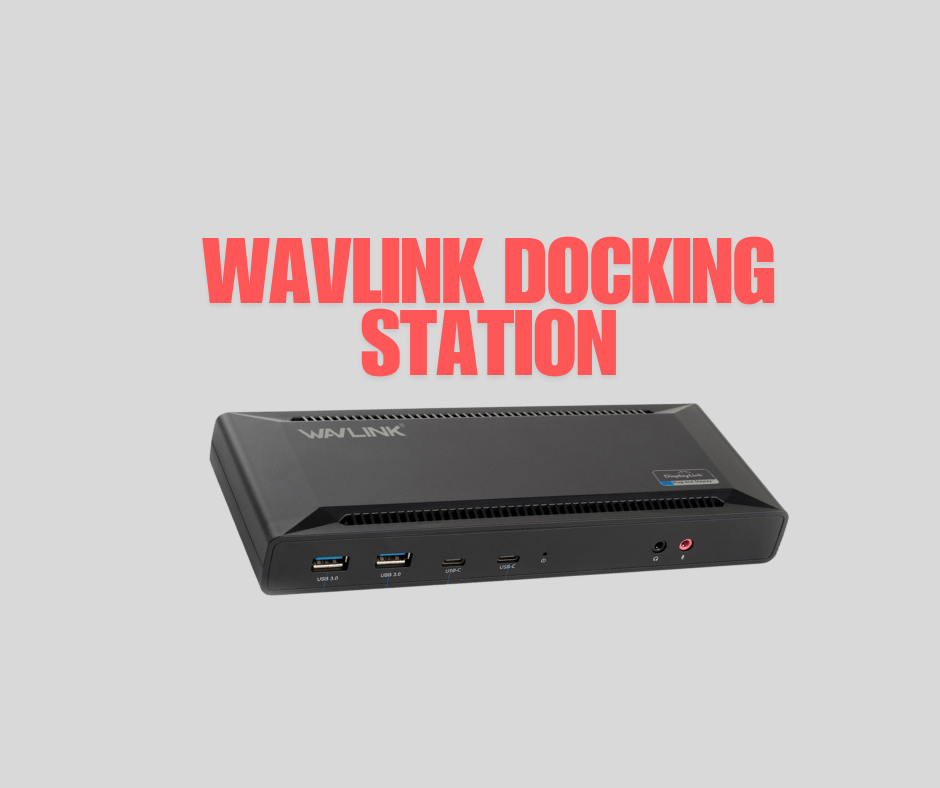
The Wavlink Docking Station is designed to bridge the gap between your devices and peripherals, providing a seamless way to enhance connectivity and functionality. Its versatility, combined with advanced technology, makes it an excellent choice for professionals, gamers, and everyday users alike.
Key Features and Specifications
- Multiple Ports for Comprehensive Connectivity
- Wavlink Docking Stations come equipped with a range of ports, including USB-C, USB-A, HDMI, DisplayPort, Ethernet, and audio jacks.
- High-speed USB 3.0 and USB 3.1 ports ensure quick data transfers, supporting rates up to 5Gbps or more, depending on the model.
- Dual or triple video output options allow users to connect multiple external monitors, making multitasking easier.
- High-Resolution Display Support
- Many Wavlink models support resolutions up to 4K or even 5K, delivering crystal-clear visuals for presentations, gaming, or creative work.
- Some models also support dual 4K displays, ideal for users who require extensive screen real estate.
- Power Delivery (PD)
- Select Wavlink Docking Stations feature Power Delivery functionality, which can charge your connected laptop or device while in use.
- Power Delivery typically ranges from 60W to 100W, depending on the model, ensuring uninterrupted performance.
- Compact and Durable Design
- Wavlink designs its docking stations to be sleek and compact, making them easy to carry for mobile professionals.
- Durable construction ensures longevity, even with frequent use.
- Plug-and-Play Capability
- Many Wavlink Docking Stations offer easy setup without requiring extensive technical knowledge. For most devices, you simply plug in and start working.
- Universal Compatibility
- Wavlink docking stations are built to be compatible with a variety of operating systems, including Windows, macOS, Linux, and Chrome OS.
- They support devices with USB-A, USB-C, or Thunderbolt 3/4 ports, ensuring flexibility across a wide range of laptops, tablets, and ultrabooks.
Compatibility with Devices
One of the standout features of the Wavlink Docking Station is its universal compatibility. It works seamlessly with:
- Laptops: From lightweight ultrabooks to powerful gaming laptops, Wavlink docking stations support various models from brands like Dell, HP, Lenovo, Apple, and more.
- Tablets: Devices such as the iPad Pro and other USB-C or Thunderbolt-compatible tablets can be easily integrated for extended functionality.
- Peripherals: Whether you’re connecting external storage, a keyboard, a mouse, or audio devices, the docking station ensures all peripherals work in harmony.
- Monitors: Multi-display setups are fully supported, whether you use HDMI, DisplayPort, or a combination of both.
By combining these features with extensive compatibility, the Wavlink Docking Station positions itself as an all-in-one solution for creating an efficient, connected workspace. It caters to diverse user needs, whether you’re a remote worker, student, or gamer, making it a valuable addition to your tech toolkit.
Unboxing and Setting Up Your Wavlink Docking Station
Getting started with your Wavlink Docking Station is a straightforward process, thanks to its user-friendly design and thoughtful packaging. This section will guide you through unboxing, setting up, and connecting your docking station to ensure a seamless experience.
What’s Included in the Box
When you open the package, you’ll typically find:
- Wavlink Docking Station: The core device, designed to connect and manage your peripherals.
- Power Adapter: Ensures stable power delivery for the docking station and connected devices.
- USB Cable: Either a USB-C or USB-A cable, depending on the model, for connecting the docking station to your computer.
- User Manual: A guide with detailed instructions on setup, compatibility, and troubleshooting.
- Driver Installation CD (if applicable): Some models may include this, though drivers can often be downloaded online.
- Warranty Information: Documentation regarding the product’s warranty and support services.
Placement and Initial Setup Instructions
Proper placement and initial setup are key to ensuring optimal performance:
- Choose the Right Location:
- Place the docking station on a flat, stable surface near your computer.
- Ensure the area is well-ventilated to prevent overheating.
- Cable Management:
- Arrange the power adapter and cables neatly to avoid tangling or clutter.
- Use cable organizers if necessary, especially if connecting multiple peripherals.
- Power Connection:
- Plug the power adapter into the docking station and connect it to a wall outlet.
- Make sure the power indicator light (if available) is on to confirm it’s working.
Connecting the Docking Station to Your Computer
- Connecting the Docking Station:
- Use the provided USB-C or USB-A cable to connect the docking station to your computer.
- If your computer has multiple USB-C ports, select the one designated for data transfer or power delivery (if applicable).
- Installing Drivers (if Required):
- Some Wavlink Docking Stations require drivers to function fully.
- If the user manual or packaging mentions driver installation, use the included CD or visit the official Wavlink website to download the latest drivers.
- Follow the on-screen instructions to complete the installation process.
- Connecting Peripherals:
- Begin plugging in your peripherals, such as monitors, keyboards, mice, and external drives, into the appropriate ports on the docking station.
- For multi-monitor setups, use HDMI, DisplayPort, or VGA ports as instructed in the manual.
- Configuring Displays and Settings:
- Once everything is connected, your computer should automatically recognize the connected devices.
- For external displays, go to your computer’s display settings to configure resolutions, orientations, and primary screens.
Testing the Setup
After connecting all devices, test each peripheral to ensure everything is functioning correctly. Check for:
- Stable internet through the Ethernet port.
- Proper display output on all monitors.
- Functionality of connected USB devices.
By following these steps, your Wavlink Docking Station will be ready to transform your workspace into a highly productive and organized hub.
Connecting Devices to the Wavlink Docking Station
Once your Wavlink Docking Station is set up, the next step is to connect your devices and peripherals. This versatile hub simplifies the process, allowing you to integrate everything from monitors to external drives seamlessly. Here’s how to make the most of your docking station’s connectivity options.
How to Connect Monitors, Keyboards, and Other Peripherals
- Monitors:
- Identify the video output ports on your docking station, such as HDMI, DisplayPort, or VGA.
- Use the appropriate cables to connect your external monitors to these ports. Ensure the cable connectors are securely fitted on both ends.
- Power on the monitors and select the correct input source using their settings menu.
- Keyboards and Mice:
- Plug your wired keyboard and mouse into the docking station’s USB-A or USB-C ports.
- Wireless devices with USB dongles can also be connected to these ports. Ensure the wireless dongle is recognized by your computer.
- External Drives and Storage Devices:
- Connect external hard drives or flash drives to the high-speed USB 3.0/3.1 ports for faster data transfer.
- For older USB devices, use USB 2.0 ports if available.
- Audio Devices:
- If your docking station includes a 3.5mm audio jack, plug in headphones, speakers, or microphones.
- Some models also support audio output through HDMI or USB-C connections.
- Internet Connection:
- For a stable, high-speed internet connection, plug an Ethernet cable into the docking station’s Ethernet port.
Configuring Multiple Displays
The Wavlink Docking Station is particularly powerful for multi-monitor setups. Follow these steps to configure them:
- Connect Displays:
- Connect each monitor to the docking station using separate video output ports. For dual or triple monitor setups, ensure that each cable is connected to a different port (e.g., HDMI 1, HDMI 2, and DisplayPort).
- Access Display Settings:
- On Windows:
- Right-click on your desktop and select Display settings.
- Detect connected monitors and arrange them by dragging their icons to match your physical layout.
- Adjust resolution, orientation, and scaling as needed.
- On macOS:
- Go to System Preferences > Displays.
- Detect monitors and configure their arrangement, resolution, and mirroring options.
- On Windows:
- Optimize Display Performance:
- Ensure the monitors are operating at their recommended resolution and refresh rate.
- If you’re using high-resolution displays (e.g., 4K), verify that your docking station and computer support them.
Managing USB and Other Port Connections
The docking station’s array of ports is designed for efficient peripheral management:
- Prioritize USB Ports:
- Use USB 3.0/3.1 ports for devices requiring high-speed data transfers, such as external drives or webcams.
- Reserve USB 2.0 ports for low-bandwidth devices like keyboards and mice.
- Organize Cable Layouts:
- Connect cables in a way that minimizes tangling or obstruction. For a clean setup, use cable ties or clips.
- Keep frequently used devices like flash drives or charging cables in accessible ports.
- Power Management:
- If your docking station provides Power Delivery (PD), ensure it’s supplying adequate power to charge your laptop or device.
- Disconnect peripherals not in use to conserve power and maintain optimal performance.
By effectively connecting and managing your devices, the Wavlink Docking Station transforms your workspace into a centralized, clutter-free hub. Its multi-device support and intuitive configurations ensure that every component works seamlessly together, enhancing your productivity and workflow.
Installing Drivers and Software
For the Wavlink Docking Station to function optimally, installing the appropriate drivers and software may be necessary, depending on your model and operating system. This section outlines a step-by-step guide for driver installation and provides solutions for common driver-related issues.
Step-by-Step Guide for Downloading and Installing Necessary Drivers
- Check Driver Requirements:
- Refer to the user manual or product packaging to determine if your docking station requires specific drivers.
- Some Wavlink models are plug-and-play, but others, especially those with advanced features like multi-display support, may need additional software.
- Visit the Official Wavlink Website:
- Open your web browser and navigate to the official Wavlink support page: https://www.wavlink.com.
- Go to the Support or Download section and search for your docking station model.
- Download the Appropriate Drivers:
- Select the correct driver version based on your operating system (Windows, macOS, Linux, or Chrome OS).
- Download the file and save it to a known location on your computer.
- Install the Drivers:
- Double-click the downloaded file to start the installation process.
- Follow the on-screen instructions, which typically involve accepting the terms and conditions and clicking “Next” or “Install.”
- Restart your computer after the installation is complete to ensure the drivers are fully integrated.
- Verify the Installation:
- Once your computer restarts, check the functionality of the docking station.
- Ensure all connected peripherals (monitors, USB devices, Ethernet, etc.) are working as expected.
Troubleshooting Driver-Related Issues
If you encounter problems during or after driver installation, follow these troubleshooting tips:
- Driver Not Detected or Failing to Install:
- Ensure you’ve downloaded the correct driver version for your operating system.
- Temporarily disable antivirus or firewall software, which may block the installation process.
- Peripherals Not Recognized:
- Unplug the docking station, restart your computer, and reconnect the docking station.
- Check that all cables are securely connected and the docking station is powered on.
- Update your operating system to the latest version, as compatibility issues might arise from outdated software.
- Display Issues:
- If external monitors aren’t working, ensure the video drivers are correctly installed.
- Check your computer’s display settings and confirm the monitors are detected.
- Use a different video output port or cable to rule out hardware issues.
- Driver Conflicts:
- Uninstall previously installed drivers that might conflict with the Wavlink software.
- To uninstall, go to Device Manager (Windows) or System Preferences > Extensions (macOS), locate the conflicting driver, and remove it.
- Contact Support:
- If all else fails, reach out to Wavlink’s technical support team for assistance. Provide details about your docking station model, operating system, and the issue encountered.
By following these steps, you’ll ensure that your Wavlink Docking Station operates smoothly, with all drivers and software correctly installed. This minimizes compatibility issues and ensures you can fully utilize the docking station’s features.
Optimizing Performance
To get the best results from your Wavlink Docking Station, it’s important to optimize its setup and manage its connections effectively. Here are some practical tips:
Tips for Efficient Cable Management
- Use Shorter Cables When Possible:
- Minimize clutter by using appropriately sized cables for your devices.
- Label Your Cables:
- For easier identification, especially in multi-monitor or multi-device setups.
- Bundle and Secure Cables:
- Use cable ties, clips, or sleeves to group cables and reduce tangling.
- Position the Dock Strategically:
- Place the docking station close to frequently used devices to reduce cable lengths.
Configuring Display Settings for Multi-Monitor Setups
- Access Display Settings:
- On Windows: Right-click the desktop and select Display settings.
- On macOS: Go to System Preferences > Displays.
- Customize Display Layout:
- Arrange monitors in the settings to match their physical placement on your desk.
- Set the primary display for taskbars or dock placement.
- Optimize Resolutions:
- Set each monitor to its recommended resolution for clear visuals.
- Extend or Duplicate Displays:
- Extend displays for multitasking or duplicate them for presentations.
Adjusting Power Settings for Better Performance
- Enable High-Performance Power Plans:
- On Windows, access Power & sleep settings and select High Performance.
- Manage USB Power Settings:
- Disable USB selective suspend in advanced power settings to prevent connected devices from entering sleep mode.
- Monitor Power Delivery:
- If using a laptop, ensure the docking station provides adequate power to charge the device while in use.
Common Issues and Troubleshooting
Despite careful setup, issues can arise. Here’s how to address common problems:
Identifying and Fixing Connection Problems
- Check Cables and Ports:
- Ensure all cables are securely connected to both the docking station and your devices.
- Verify Power Supply:
- Confirm the docking station’s power adapter is connected and the power indicator is lit.
- Restart Devices:
- Unplug the docking station, restart your computer, and reconnect.
Solving Issues with Unrecognized Devices
- Update Drivers:
- Ensure drivers for the docking station and connected peripherals are up-to-date.
- Check Device Manager:
- On Windows, look for unrecognized devices under Device Manager and update their drivers.
- Try Different Ports:
- Move the device to another port on the docking station to rule out a faulty connection.
Resetting the Docking Station If Needed
- Power Cycle:
- Disconnect the docking station from power and all connected devices for 10–15 seconds. Reconnect and test.
- Factory Reset:
- Refer to the user manual for instructions on performing a factory reset, if available.
Maintenance and Care for Your Wavlink Docking Station
Proper maintenance ensures your docking station remains functional and lasts longer.
Tips for Keeping the Docking Station Clean and Functional
- Dust Regularly:
- Use a soft, dry cloth to clean the surface and ports. Avoid using liquid cleaners directly on the device.
- Inspect Cables and Ports:
- Check for debris or damage in ports and connectors. Replace damaged cables immediately.
- Ventilation:
- Keep the docking station in a well-ventilated area to prevent overheating.
Ensuring the Longevity of the Device
- Avoid Overloading Ports:
- Do not connect more devices than the docking station’s specifications allow.
- Handle With Care:
- Avoid dropping the docking station or placing heavy objects on it.
- Store Properly:
- When not in use, disconnect all peripherals and store the device in a clean, dry location.
By following these optimization, troubleshooting, and maintenance tips, your Wavlink Docking Station will deliver consistent performance, ensuring it remains an indispensable tool in your workspace for years to come.
Read more: Wavlink AC1200 Performance and Specifications
Conclusion
The Wavlink Docking Station is a versatile and powerful tool that enhances connectivity and streamlines your workflow. Whether you’re setting up a multi-monitor workstation, managing numerous peripherals, or optimizing power delivery for your devices, the Wavlink Docking Station provides a reliable and efficient solution.
By understanding its features, setting it up properly, and maintaining it with care, you can fully unlock its potential. From simplifying cable management to resolving connectivity issues, this device proves invaluable in both professional and personal settings. With proper maintenance and troubleshooting, the docking station will continue to serve as a cornerstone of your productivity, making it an essential component of any tech-savvy workspace.
Investing in a Wavlink Docking Station is not just about enhancing device connectivity; it’s about building a seamless, efficient, and organized digital environment. With the knowledge provided in this guide, you’re now equipped to make the most out of your Wavlink Docking Station.

